
Whenever I go back home, I always hope my mum will cook croquettes. It’s a dish that reminds me of my childhood, usually accompanied with fries and ketchup. I always remember my brother eating 16 of them in one sitting. When my parents went on holidays once we were older, my mum would leave a batch of them ready for us in the freezer.
This is, along Spanish omelette, one of my favourite dishes ever. My nan used to make them with thick pieces of ham in them, which I didn’t like, but my mum makes them all soft and smooth. The ones below are not made exactly to recipe, as they don’t have any ham or onion in them. You can also use leftover chicken from any other boiled dish you’ve made, like cocido madrileño (a recipe I might share with you someday too).
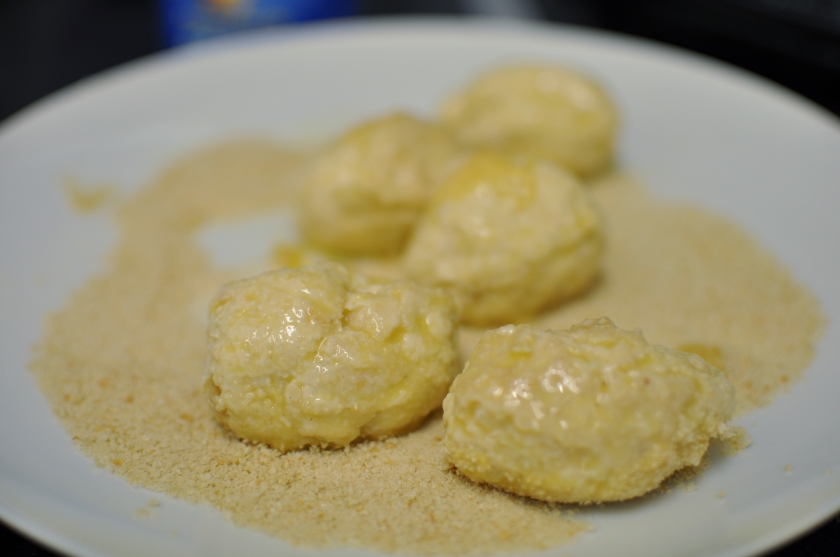
I think I got around 15 croquettes this time around, but it really depends on how big you make them! Also, if you use the ham, note that this will make them saltier.
Even though it has a bechamel sauce (or white sauce), this dish is really easy to make! Almost foolproof!
Mum's Chicken Croquettes
Ingredients
- Enough oil for bechamel and to fry
- 6 spoons of flour
- 1/2 chicken
- Serrano ham
- Bay leaves
- About half an onion
- 3 glasses of milk
- 1 OXO cube
- Salt
- 1 egg
- Breadcrumbs
Preparation
- Boil the chicken with Serrano ham thick cuts (Prosciutto should also work), bay leaves, onion, OXO cube and a bit of salt. Keep stock aside. Or use leftover chicken!
- Mince chicken (and ham) in a food processor.
- Pour a bit of oil in a non-sticking pan (a few spoons only) and add the 6 spoons of flour. Fry until flour gets golden, do a better job at avoiding lumps than me.
- Add the minced chicken to the flour and stir. Let it golden for a bit.
- Add either 3 glasses of milk, or 2 glasses of milk and 1 of chicken stock, and salt (a pinch). Stir well until a thick paste is formed. It should look like a really thick porridge, not runny. Stress because it burns while you’re trying to take photos with one hand, and fail at stirring with the other. Almost drop pan on the floor. Decide not to take photos of this step.
- Get the paste through the food processor or a hand-held blender, to make a smooth mixture before it sets.
- Pour the mixture into a large bowl and let cool down before placing it in the fridge overnight. It works better when it hardens! Lick the spoon.
- When you’re ready to make the croquettes, beat the egg in a soup plate, and put the breadcrumbs in another plate, which can be flat.
- Make the croquettes by making balls with your hands. The way we do it at home is by taking some paste with a fork, placing it in our palms and rolling between both hands. It gets sticky and messy, but it’s therapeutic! If you lick your fingers (highly recommended before the mixture gets in the egg plate), wash your hands before touching the food again!
- Place each croquette in the egg, roll it to make sure it gets covered, before moving them to the breadcrumbs. Roll again until it gets all covered in crumbs. Having forks to help you with these two steps is advisable.
- In a frying pan, pour enough frying oil to cover about half of a croquette. Let it get really hot.
- Fry the croquettes, making sure they get golden on all sides. When removing them from the pan, place on a plate lined with a couple of kitchen roll sheets, to absorb the excess oil.


They can be enjoyed both hot and at room temperature! They’re really good served with fries, and you can dip them in ketchup or mayonnaise.
This dish is incredibly tasty, if not that healthy (it’s fried, after all), so if you want a healthier version, have only 4 per serving with a salad on the side and avoid any sauces like ketchup.
If you try making this dish, let me know how it went and whether you liked it! I’ll try to share more homemade recipes with you.
Homemade recipe: Mum’s Chicken Croquettes appeared first on [shutter and ink.] on May 2015.

I love the texture and delicate flavor of chicken!
I agree. And the best part is that you can season it and cook it in many different ways, ending up with really different and interesting flavours!
Definitely the possibilities and varieties are endless and taste enhances when you exchange ideas. Happy cooking ❤ ❤
Reblogged this on global_food.
Thanks! Really appreciate it.